Corinne in Season
Crispy Three Cheese Chicken Parmesan
Golden, crispy chicken topped with a rich tomato sauce, layers of melty Havarti and mozzarella, and a sprinkle of Parmesan. This is my take on classic chicken Parm, with a few little tricks that make all the difference. Juicy chicken thighs, Parmesan mixed right into the breadcrumbs, and a quick homemade sauce that's thick enough to keep that crispy coating intact. Finished under the broiler until the cheese is golden and bubbly. Comfort food at its finest.
Ingredients
- For the Chicken
- 1½ lbs boneless, skinless chicken thighs (about 4–6 pieces)
- ½ cup all-purpose flour
- 2 large eggs
- 1½ cups panko breadcrumbs
- ½ cup freshly grated Parmesan cheese
- 1 tsp garlic powder
- 1 tsp Italian seasoning
- ½ tsp kosher salt, plus more for seasoning chicken
- ½ tsp freshly ground black pepper
- Neutral oil, for shallow frying
- For the Homemade Tomato Sauce
- 2 tbsp olive oil
- 4 cloves garlic, minced
- ½ tsp crushed red pepper flakes (adjust to taste)
- 2 tbsp tomato paste
- 1 can (28 oz) crushed tomatoes
- 1–2 tsp honey, to taste
- ½ tsp kosher salt, plus more to taste
- For Assembly
- 4–6 slices Havarti cheese (provolone works too)
- 1 cup shredded mozzarella cheese
- ¼ cup freshly grated Parmesan cheese
- Fresh basil, for garnish
- Optional Arugula Salad
- 4 cups fresh arugula
- 1 tbsp fresh lemon juice
- 2 tbsp olive oil
- 1 tsp Dijon mustard
- 1 tsp honey
- Salt and black pepper, to taste
- Freshly shaved Parmesan, for serving
Instructions
Prepare the chicken.
Pat the chicken thighs dry with paper towels. Trim any excess fat and gently flatten any particularly thick pieces so they cook evenly. Season both sides with a little salt and pepper.
Set up your breading station.
Prepare three shallow bowls. Add the flour to the first, whisked eggs to the second, and panko breadcrumbs, Parmesan, garlic powder, Italian seasoning, salt, and pepper to the third.
Bread the chicken.
Working one piece at a time, dredge the chicken in flour, shaking off any excess. Dip into the beaten eggs, then press firmly into the Parmesan breadcrumb mixture, making sure every side is evenly coated.
Chill for extra crunch.
Arrange the breaded chicken on a parchment-lined baking sheet and refrigerate for 30 minutes. This little trick helps the breading adhere to the chicken so it doesn't fall off while frying!
Start the tomato sauce.
While the chicken chills, heat olive oil in a saucepan over medium-low heat. Add the minced garlic and crushed red pepper flakes. Sauté for about 1 minute, stirring frequently, until fragrant. Be careful not to burn the garlic.
Build the flavor.
Stir in the tomato paste and cook for 2–3 minutes, until it darkens slightly and becomes fragrant. This helps deepen the flavor of the sauce.
Blend and simmer.
For a smoother sauce, blend the crushed tomatoes using an immersion blender in a deep, splash-safe container or saucepan. Add the tomatoes to the pan with the garlic and tomato paste. Stir in the honey and salt, then reduce the heat to low. Let the sauce gently simmer uncovered for 15–20 minutes, stirring occasionally, until slightly thickened. Taste and adjust the seasoning as needed.
Fry the chicken.
Pour about ¼ inch of neutral oil into a large skillet and heat over medium heat to approximately 350°F. Working in batches, fry the breaded chicken for about 4–6 minutes per side, depending on thickness, until golden brown, crispy, and cooked through to an internal temperature of 165°F. Avoid overcrowding the pan.
Keep it crispy.
Transfer the fried chicken to a wire rack set over a baking sheet to allow any excess oil to drip off. Keeping it elevated prevents the bottom from becoming soggy.
Assemble the chicken Parm.
Preheat your broiler to high. Place the crispy chicken on an oven-safe wire rack set inside a baking sheet or baking dish. Spoon a generous layer of the thickened tomato sauce over each piece, followed by slices of Havarti (or provolone), shredded mozzarella, and a sprinkle of freshly grated Parmesan.
Broil until bubbly.
Place the chicken under the broiler for approximately 2–4 minutes, or until the cheese is completely melted, bubbly, and lightly golden. Keep a close eye on it because the cheese can go from perfectly golden to burnt pretty quickly!
Make the arugula salad.
While the chicken finishes, whisk together the lemon juice, olive oil, Dijon mustard, honey, salt, and pepper. Toss with fresh arugula and finish with shaved Parmesan.
Serve and enjoy!
Garnish the chicken Parmesan with fresh basil and serve immediately alongside the lightly dressed arugula salad. Crispy, saucy, cheesy perfection!
Corinne's tips
Chicken thighs are the secret:
I prefer boneless, skinless chicken thighs because they're incredibly juicy and much more forgiving than chicken breasts. You get that beautifully crispy exterior without worrying as much about drying out the meat.
Chill before frying:
Refrigerating the breaded chicken for 30 minutes helps the coating adhere. Less breading falling off in the pan means a crispier, more evenly coated chicken Parm.
Parmesan in the breadcrumbs:
Adding freshly grated Parmesan directly to the breadcrumb mixture gives the chicken an extra layer of savory flavor and helps create that delicious golden crust.
Thicker sauce = crispier chicken:
A watery tomato sauce will quickly soften the crispy coating. Blending and simmering the sauce until it thickens helps prevent sogginess.
Don't drown the chicken:
You want enough sauce to give every bite that classic chicken Parm flavor, but not so much that you lose the crunch you worked so hard for.
Mix your cheeses:
Havarti makes this extra creamy and melty, while mozzarella gives you that classic cheese pull. Provolone is another great option if you don't have Havarti.
Use a wire rack:
Keeping the chicken elevated after frying and while broiling helps prevent the bottom from sitting in excess oil or sauce.
Watch the broiler:
The cheese only needs a few minutes to melt and brown. Stay close to the oven!
Don't over-chop the basil:
Tear or roughly chop fresh basil just before serving to preserve its flavor and aroma.
The arugula salad balances everything:
A bright, lemony salad cuts through the richness of the fried chicken and melted cheese. It's such a simple pairing, but so good.
Make ahead:
The tomato sauce can be prepared up to 3 days in advance and refrigerated. Bread the chicken up to a day ahead, then fry and assemble just before serving for the crispiest results.
corinneinseason.com
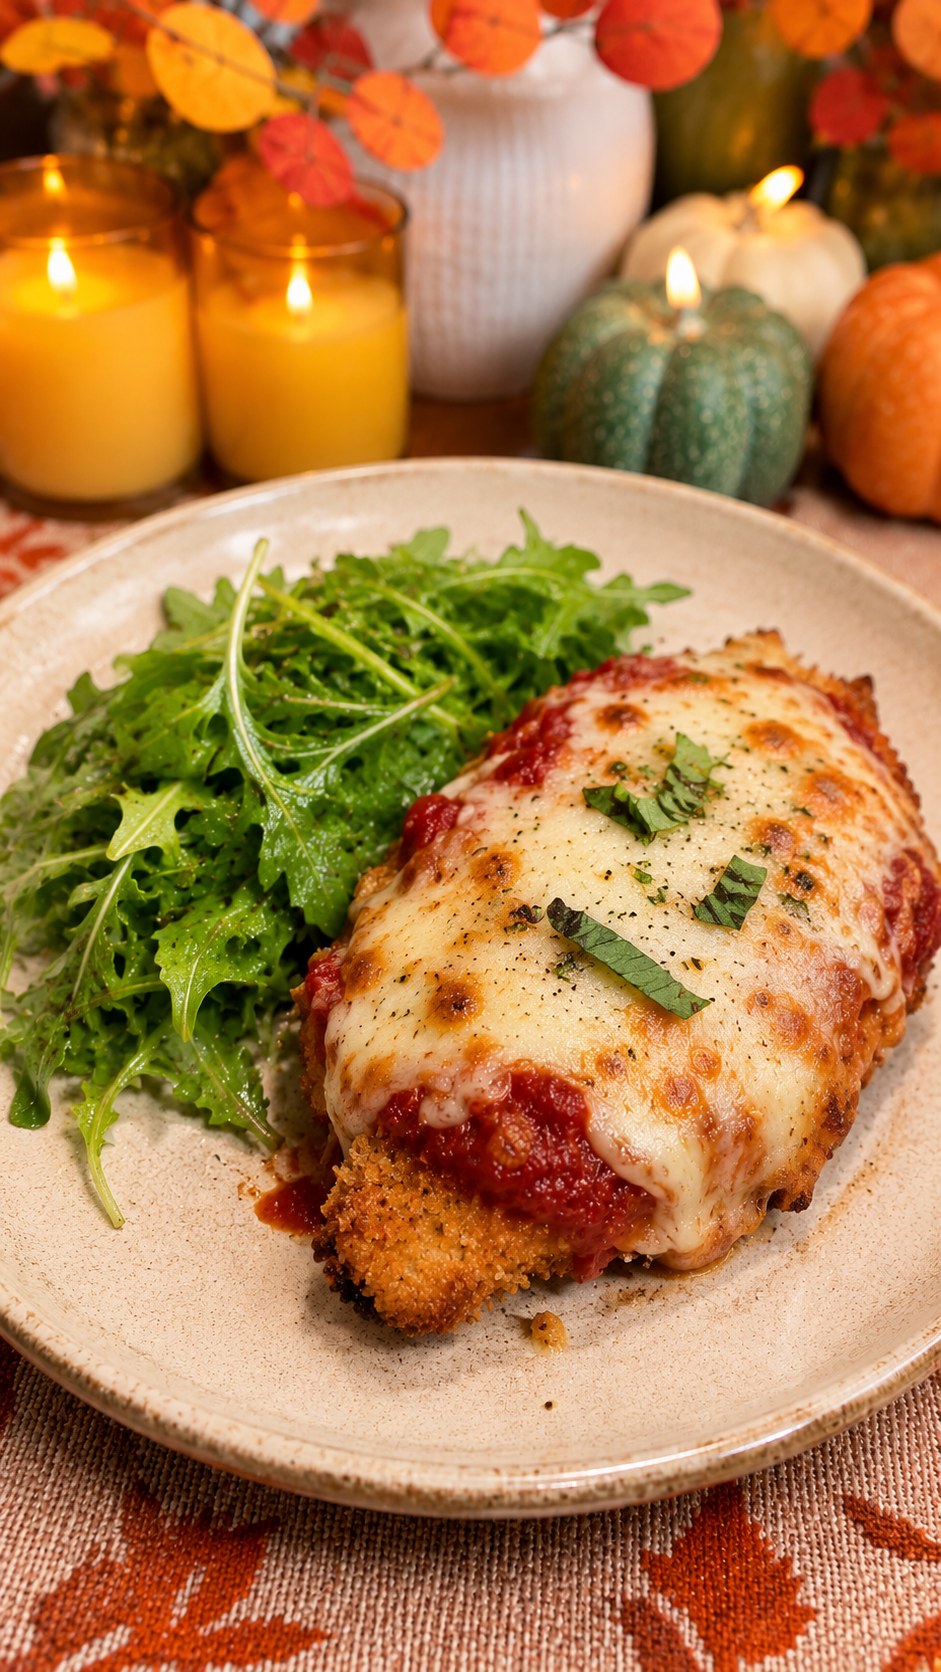
Crispy Three Cheese Chicken Parmesan
Golden, crispy chicken topped with a rich tomato sauce, layers of melty Havarti and mozzarella, and a sprinkle of Parmesan. This is my take on classic chicken Parm, with a few little tricks that make all the difference. Juicy chicken thighs, Parmesan mixed right into the breadcrumbs, and a quick homemade sauce that's thick enough to keep that crispy coating intact. Finished under the broiler until the cheese is golden and bubbly. Comfort food at its finest.
- For the Chicken
- For the Homemade Tomato Sauce
- For Assembly
- Optional Arugula Salad
Make the board everyone asks
“Did you really make this?”
Explore the course Corinne’s tips
I prefer boneless, skinless chicken thighs because they're incredibly juicy and much more forgiving than chicken breasts. You get that beautifully crispy exterior without worrying as much about drying out the meat.
Refrigerating the breaded chicken for 30 minutes helps the coating adhere. Less breading falling off in the pan means a crispier, more evenly coated chicken Parm.
Adding freshly grated Parmesan directly to the breadcrumb mixture gives the chicken an extra layer of savory flavor and helps create that delicious golden crust.
A watery tomato sauce will quickly soften the crispy coating. Blending and simmering the sauce until it thickens helps prevent sogginess.
You want enough sauce to give every bite that classic chicken Parm flavor, but not so much that you lose the crunch you worked so hard for.
Havarti makes this extra creamy and melty, while mozzarella gives you that classic cheese pull. Provolone is another great option if you don't have Havarti.
Keeping the chicken elevated after frying and while broiling helps prevent the bottom from sitting in excess oil or sauce.
The cheese only needs a few minutes to melt and brown. Stay close to the oven!
Tear or roughly chop fresh basil just before serving to preserve its flavor and aroma.
A bright, lemony salad cuts through the richness of the fried chicken and melted cheese. It's such a simple pairing, but so good.
The tomato sauce can be prepared up to 3 days in advance and refrigerated. Bread the chicken up to a day ahead, then fry and assemble just before serving for the crispiest results.